Using the notch accessory for the Roman workbench.

The notch accessory is something that has been floating around in my mind, for a long time. God only knows why it's took me so long to build the thing. Especially since the original ideas/concepts work as well as they do, in my original thinking. That's not to say it's perfect, or that I got things right first time around. There is much that can be perfected and improved upon including proper usage. With all that being said for what it is, and how quickly it can be made, it performs quite well.
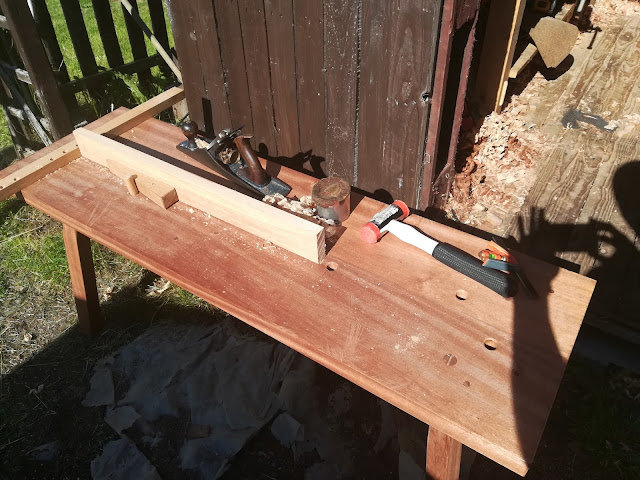
I'm not 100% sure but, I think the original idea came from the need, to resaw a board. The first outing with the idea/test, was carried out with a single piece of scrap wood, which was around 80mm in width. I wedge this into the notch, then butted and wedged the work piece against the scrap wood, much like the picture below. Other uses became evident quickly, and issues presented themselves, specifically two main problems. The first being that the work piece was able to move left to right, with enough force admitted. The second problem was that the scrap wood, would vibrate and effect the task at hand.
The solution was simple, and solved both problems together, create a 90° angle (L shape), which strengthens the accessory much like a steel "L" beam. I also thought it would be a good idea to add dog holes, which I didn't add until my second version. I also discovered that instead of making the accessory 90° it was better to make it around 89°. The 89° causes the accessory to nip a work piece, enabling you to have both hands free to adjust your work piece, and put the wedge in place. Ironically I messed up with the second version. The face of the wood wasn't square, and I never checked it, which gave me around 91.5°, not ideal but the accessory still works reasonable well.

The above picture is an example of how I would endgrain plane a board, I would also resaw like this. A single wedge and peg is used in this set-up and gives great clamping pressure. I've added holes in the side of the bench, as I've needed them (which I recommend), instead of drilling multiple holes. In the picture you can see I'm using a spacer to accommodate the wedge, instead of drilling more holes, which would be too close together, and possibly break through to each other, under pressure from the peg and wedge.

Planing multiple glued up boards is a pleasure, and the quickest set up. Literally slide the piece into position and start planing. No wedges, pegs or clamps are required, making swapping out multiple pieces a breeze.

The above picture is showing how I would hold a small leg, maybe to cut some joinery. I use the pegs and wedges in this situation. Sometimes I use two wedges, which allows me more freedom to carry out tasks 360° around the accessory, without the piece coming loose. Obviously this does have its limitations, especially when cutting in the width way orientation of the bench, which can cause the bench to rock.

One of the things I noticed immediately is that, because the thickness of the material used for the accessory (21mm), the pegs will twist outward a lot when wedged. I think when I make the next one, 30mm thick material will help with the issue. I also found that good fitting pegs work better with this thickness.

A relatively new idea what I've had, and I haven't really explored it a great deal, is a lever arm clamp. It is was it sounds like, a lever arm! This works with leverage and friction. The contact point on the end of the arm has a radius, which tightens when the arm is pushed down.
The very little time I have experimented with it, I did pick up on a few things. It definitely needs some edge material on the radius, like leather or crubber. This helps with the friction, and stops work pieces coming loose. Sometimes, depending on the width of the material, it's not possible to push the arm down as much as is adequate. This results in the work piece coming loose, and falling when downward force is applied, like sawing. Putting a dog in for the work piece to rest on, or allowing the work to rest on the ground, which solves the problem.

Another idea that presented itself as soon as I had built the accessory, was a make shift moxon vise. I fixed the accessory to the bench with one peg and one hold fast. I used two f clamps to secure the work piece, and was able to cut dovetails. The orientation of the accessory pictured above, works well because the force is exerted length ways, eliminating any rocking, which is a good point to note. With the 21mm thick material there was a tiny amount of flex in the accessory, which wasn't really a concern but, I thought I'd mention it. I dare say, some time in the near future, I may add a removable jaw to create a wedge styled moxon vise.
There is a video to accompany this article on my YouTube channel which you can find HERE in my linktree, as well as my free Roman workbench ebook, and all my content.

Pretty good post. I just stumbled upon your blog and wanted to say that I have really enjoyed reading your blog posts. Any way I'll be subscribing to your feed and I hope you post again soon. Big thanks for the useful info. woodworking and finish carpentry Weston MA
ReplyDeleteThe Best Slots | Casino Roll
ReplyDeleteThe best slots at Casino Roll. If you kadangpintar love table games, to play blackjack, you have to https://septcasino.com/review/merit-casino/ bet twice for 출장마사지 the dealer apr casino to win. The casino-roll.com dealer must
Amazing post, thanks for sharing such an informative article. The information provided in the article is among the most beneficial. white house furniture for sale We appreciate you sharing it with us.
ReplyDeleteIf not, you should to} nonetheless play French or European roulette online over American as the home edge is decrease. To play roulette with real cash, you in fact must get real cash into your on line casino account. What follows is a quick overview of one of the best ways to make 카지노사이트 deposits and means to|tips on how to} complete your withdrawals too.
ReplyDelete