Most
wood workers or indeed keen diy'ers will own a number of tools. So with
this comes the need to store them, keep them safe and so on. So the
quest begins.
 There
are many options , opinions and ideas. Some say that a toolbox is kind
of a right to passage , showing off the skill of that person normally
involving a lot of dovetails. Dovetails are strong , look good and will
stand the test of time but, will also take some time, especially if your
opting for a chest with tills. I do use dovetails in my work but I
didn't want to spend that time when there's other options . Others will
opt for a mix of dovetails (or other joints) and screws/nails and these
type of box's can be really good as well. so what do you build?
There
are many options , opinions and ideas. Some say that a toolbox is kind
of a right to passage , showing off the skill of that person normally
involving a lot of dovetails. Dovetails are strong , look good and will
stand the test of time but, will also take some time, especially if your
opting for a chest with tills. I do use dovetails in my work but I
didn't want to spend that time when there's other options . Others will
opt for a mix of dovetails (or other joints) and screws/nails and these
type of box's can be really good as well. so what do you build?


 on. It uses four screws as
the hinge system, so no need to buy hinges. The center has a flat
surface to store planes etc. So I built the thing, changed the design to
include some dovetails and fitted it out with my tools which took
considerable longer then making it.
on. It uses four screws as
the hinge system, so no need to buy hinges. The center has a flat
surface to store planes etc. So I built the thing, changed the design to
include some dovetails and fitted it out with my tools which took
considerable longer then making it.
It
was done. I marveled at the toolbox , and began using it but soon
discovered the design wasn't for me. It was long and heavy with only a
single hand cutout , putting all the weight onto one arm and one side of
the body. I find it awkward to reach around the backside for tools and
was it necessary to put all the tools in holders? And of course, the
Biggie , I didn't anticipate extra tools which there's no room for.
I did learn a few lessons while making and using the box which did lend themselves in this build.
1.Use a light material. Pine is a good choice, it's light and readily available here in the UK. Which is my choice for this build.
2.Don't over complicate things, keep things simple and practical.
3.The length of your toolbox has to (at the least) accommodate your longest tool which in my case is my rip saw.
4.Build the toolbox big enough to accommodate some extra tools you WILL acquire.
With
these points in mind I also wanted the build to be quick but still
strong and potentially use the box for a platform if I ever needed to. I
had given the toolbox a lot of time and thought. I was leaning towards a
Dutch tool chest which I do like but, the slopping lid stops you from
using the chest as a platform to saw on if needed, or to rest a piece
your working on if your bench is to high for the task at hand. The lid
was thought to be slopped for rain and/or for paperwork. The drop down
lid is a good idea but, for me , same again, it has no use that I'm
aware of and you can't really mount any tools to it.
Scrolling
through Instagram getting my visual woodworking fix I seen a Japanese
toolbox and couldn't believe how simple the box was and, the fact that I
had never seen one before. I was so impressed that I knew this was going
to be my new toolbox. It ticked all the boxes but, I didn't like the
way that all the tools where just stuffed in there. so after a little
thought I decided that there could be a little bit of tool organization
without complicating the box by use of rare earth magnets and tool clips. I have opted
for housing joints and some rose head nails for the build but I have
seen the boxes with just nails, through tenon's and finger joints.
 I started off with gluing 2 boards together which were 9" each.
 wall back no matter how careful
you are. This is why it is a good idea to mark the joint out this way.
Once the knife wall is established then a valley is made with a chisel
leaving a peak in the middle. I then remove the thick of this with a
chisel and finish it off
with a router plane. The other three joints are cut in the same manner.
I then placed the sides boards on the bottom board and put a pencil
mark inside the housing, this gave me the length of the two boards that
will fit into the housing joint.
wall back no matter how careful
you are. This is why it is a good idea to mark the joint out this way.
Once the knife wall is established then a valley is made with a chisel
leaving a peak in the middle. I then remove the thick of this with a
chisel and finish it off
with a router plane. The other three joints are cut in the same manner.
I then placed the sides boards on the bottom board and put a pencil
mark inside the housing, this gave me the length of the two boards that
will fit into the housing joint.
 pattern . This
helps to stop pieces coming apart. I
placed the bottom board onto the box's frame and lined one side flush.
The bottom board had some cupping (bending) so, I nailed the two corners
of the side I had just flushed. I was then able to clamp the board
flat. I marked out for the rest of the nails and repeated the same
dovetail like pattern for the pilot holes. There was a slight lip on the
bottom board which I planed off.
pattern . This
helps to stop pieces coming apart. I
placed the bottom board onto the box's frame and lined one side flush.
The bottom board had some cupping (bending) so, I nailed the two corners
of the side I had just flushed. I was then able to clamp the board
flat. I marked out for the rest of the nails and repeated the same
dovetail like pattern for the pilot holes. There was a slight lip on the
bottom board which I planed off.
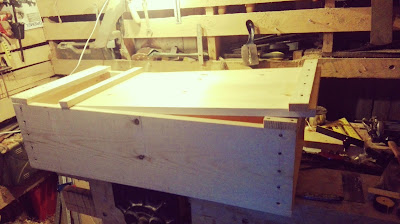
I cut two strips for the top which
were fixed in the same manner as before. One of the strips has a bevel
on it , about 80°. This will accommodate the wedge that locks the lid
that is also beveled and tapered. I cut the wedge and two battens, again
one had a bevel for the wedge. I ripped the lid to width and finished
one end with the plane. I placed two battens on the top of the box to
support the lid. I took a lot of time moving the lid back and forth ,
making pencil marks and making sure the lid will fit in the open/closed
position. When I was happy I cut the lid to length.
a bevel
on it , about 80°. This will accommodate the wedge that locks the lid
that is also beveled and tapered. I cut the wedge and two battens, again
one had a bevel for the wedge. I ripped the lid to width and finished
one end with the plane. I placed two battens on the top of the box to
support the lid. I took a lot of time moving the lid back and forth ,
making pencil marks and making sure the lid will fit in the open/closed
position. When I was happy I cut the lid to length.
 a bevel
on it , about 80°. This will accommodate the wedge that locks the lid
that is also beveled and tapered. I cut the wedge and two battens, again
one had a bevel for the wedge. I ripped the lid to width and finished
one end with the plane. I placed two battens on the top of the box to
support the lid. I took a lot of time moving the lid back and forth ,
making pencil marks and making sure the lid will fit in the open/closed
position. When I was happy I cut the lid to length.
a bevel
on it , about 80°. This will accommodate the wedge that locks the lid
that is also beveled and tapered. I cut the wedge and two battens, again
one had a bevel for the wedge. I ripped the lid to width and finished
one end with the plane. I placed two battens on the top of the box to
support the lid. I took a lot of time moving the lid back and forth ,
making pencil marks and making sure the lid will fit in the open/closed
position. When I was happy I cut the lid to length. 
I
put the lid battens and wedge in place on the box, I lined the lid up
with the pencil marks, double checked the battens and wedge was in
place. This gave me the placement of the battens. Again , I had cupping
in the lid so I clamped the battens in place and marked out the pilot
holes. When the nails where seated the ends were bent over to stop the
batten separating from the lid, the wedge needed a little fitting and
the lid was
seated the ends were bent over to stop the
batten separating from the lid, the wedge needed a little fitting and
the lid was  done. Next was the handles
 seated the ends were bent over to stop the
batten separating from the lid, the wedge needed a little fitting and
the lid was
seated the ends were bent over to stop the
batten separating from the lid, the wedge needed a little fitting and
the lid was  done. Next was the handles
which were two strips , with a
bevel on one side to accommodate my fingers tips. I glued and nailed the
handles in place.
At
this point your pretty much done. Nearly all the examples of the box's
I've seen, the tools are
 just placed on top of one another with not a
lot of organization. I opted for tool clips, rare earth magnets and
several wooden holds. I attached these to the underside of the lid and ,
was able to house a good few tools. The lid hangs very nicely on the
end of the box by the batten. This could be clamped in place but I've
not yet seen the need, the weight of the lid keeps itself in place.
just placed on top of one another with not a
lot of organization. I opted for tool clips, rare earth magnets and
several wooden holds. I attached these to the underside of the lid and ,
was able to house a good few tools. The lid hangs very nicely on the
end of the box by the batten. This could be clamped in place but I've
not yet seen the need, the weight of the lid keeps itself in place.
All in all its a good sturdy box with lots of room, the lid has a lot of tool storage and could be hung on a wall etc. The box can be used as a platform/saw horse. I did also have the idea that, it could be used as a poor man's moxon vise. Although I have not yet tried this idea out , I think the box is stout enough , has the height and, has plenty of clamping area for wide boards. Another unexpected plus is there is a lot
of area to hang or sit your tools without fully putting them away which
keeps the bench nearly clutter free. I also added some rare earth
magnets to the outside and these hold my rip and crosscut saws
vertical.
is there is a lot
of area to hang or sit your tools without fully putting them away which
keeps the bench nearly clutter free. I also added some rare earth
magnets to the outside and these hold my rip and crosscut saws
vertical.
This was a quick build and it was intended to be. So I would recommend to anyone who doesn't want to spend a great deal of time or, anyone that can't cut dovetails yet. Tool tills could be added so, that is a possibility some may consider.


All in all its a good sturdy box with lots of room, the lid has a lot of tool storage and could be hung on a wall etc. The box can be used as a platform/saw horse. I did also have the idea that, it could be used as a poor man's moxon vise. Although I have not yet tried this idea out , I think the box is stout enough , has the height and, has plenty of clamping area for wide boards. Another unexpected plus
 is there is a lot
of area to hang or sit your tools without fully putting them away which
keeps the bench nearly clutter free. I also added some rare earth
magnets to the outside and these hold my rip and crosscut saws
vertical.
is there is a lot
of area to hang or sit your tools without fully putting them away which
keeps the bench nearly clutter free. I also added some rare earth
magnets to the outside and these hold my rip and crosscut saws
vertical. This was a quick build and it was intended to be. So I would recommend to anyone who doesn't want to spend a great deal of time or, anyone that can't cut dovetails yet. Tool tills could be added so, that is a possibility some may consider.
Would you like to start learning the Cut The Wood woodworking craft? It's not exactly easy, at least not if you want to become good at what you're doing, but it's fun and it's worth all the effort for sure. You will need some guidance though and you can get it on the net if you want to make it as easy as possible for yourself.
ReplyDeleteNew web site is looking good. Thanks for the great effort. take a look at the site here
ReplyDelete