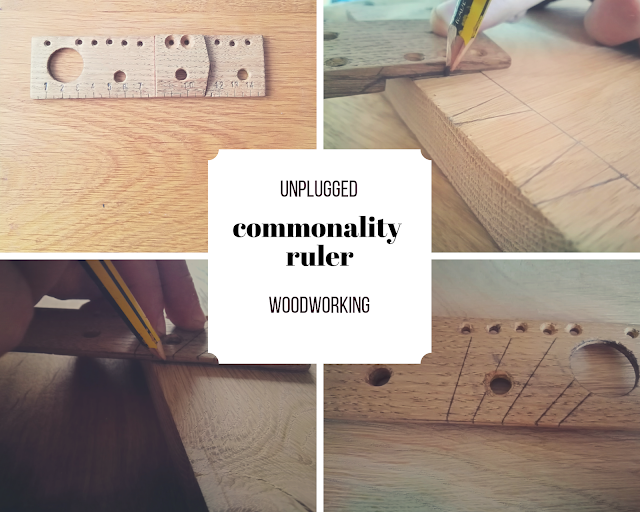
Anyone who has been practising woodworking or DIY , will most likely have came across or own a multi tool. Some of them are good, and some of them , are well ........... shite. And I think sometimes it's because there just not practical to the task(s) at hand. On the occasions they are practical to the task, they can be excellent.
Making myself a small wooden ruler, had been floating around in my head for a little while , which could fit in my pocket, and would be really handy (helpful). Then I thought to myself, if i remove a section of wood , it will also be a small square, pretty handy as well . So that got me thinking, how many practical applications could I make this simple ruler perform, for the work I carry out ?
The answer was ten in total, and built my uses on commonality in my own work, although two uses were a bit less common in my day to day work, they were still useful so I included them.
The first use is obvious, a ruler. A small ruler is very handy, practical and common for me to use in my work.
There is a small square , again common for me to use repetitively , for marking up edges and smaller pieces.
The square portion of tool , measures 80mm from the shoulder to the the end. 80mm is a common size I will regular rip material to, I normally set a small combination square and drag a pencil line down the length. So it made sense to use this measurement.
Keeping on the subject of dragging pencil lines. This is a ruler and a fence can be made , with the thumb and first finger for dragging lines pretty accurately.
On the same side of the square, there is a dovetail template. And I commonly cut dovetail joints. See where I'm going with the commonality?!
There is a 22mm circle cut in the ruler, this is to mark out a rounded edge. It's common for me to use around 22mm thick stock, and commonly round over dovetails and other edges.
There are a number of small holes down the ruler, these are at 10mm intervals. Add a pin, nail or another point and you have simple compass.
I have some pre-set angles on the ruler that I commonly use in my work. These allow me to quickly set my bevel.
Tilt the ruler to the right while in the square position, and I have an angle finder. This is the same idea as a speed square.
There are two larger holes in the ruler, which are a friction fit for pencils. Insert the pencils and tilt the ruler, use another pencil in the middle hole and the ruler is now a centre finder.
Making the ruler is pretty simple, a few cuts and you have the basic shape. However scoring the wood for the millimetre marks, is time consuming and fiddly . Take your time with this, as one mistake might mean, you have to start again. I bought a cheap number punch from Amazon for the the numbers, which didn't work out to great to be honest . The choice of my wood was poor, but it was scrap. It was kiln dried oak and was dry as sticks. The grain was loose as well. This made the wood a little difficult to work. Some air dried oak would have been better , and some air dried beach would be excellent.
When I drilled the holes they ended up out of line, due to me being to eager and not spending the time with an awl. Making the ruler on the fly and being to eager, I also drilled the centre hole on the centre finder to big. It should have been a lot smaller , just enough to accommodate the pencil point. The compass holes also should have been smaller too (2mm). The centre finder holes should have been closer together to allow for better positioning of the layout angles . The ruler should have been 50 - 60mm instead of 40mm. The length (150mm) , I think is a good length, and the total thickness is 8mm and the square and dovetail portion is 4mm. This was rushed but, it is also a prototype and a usable one, mistakes and all, even the number 3!
Below is a YouTube video, showing the ruler in use and myself making it. Anyone wishing to support my blog/YouTube channel so l can continue to post videos and articles , can donate here https://www.paypal.me/unpluggedwoodworking


The commonality ruler is really cool - makes sense to have a tool that you can pick up and use in a multitude of situations. Thanks for the video!
ReplyDeleteIt does , doesn't it. Mk 2 coming soon. Thanks for reading/watching.
Deleteman, this is terrific. I have a scrap of pretty fancy, thin plywood, and I think i'll laminate the dovetail/square layer. I might not be able to get that bevel, though.
ReplyDeleteThanks man. I think I'll be making a mark 3 soon. There handy little gizmos to have around.
Delete